Window Control Area
Setting the window_control_area on an element allows gpui to create actions on that element for dragging, minimizing, maximizing and closing the window.
This allows you to create a custom Headbar for your application.
Hiding the default window decorations
let win_options = WindowOptions {
    // This hides the window decorations on Linux. Server -> X11/Wayland, Client -> Your app
    window_decorations: Some(gpui::WindowDecorations::Client),
    titlebar: Some(TitlebarOptions {
        // This hides the window decorations on Windows and MacOS
        appears_transparent: true,
        ..Default::default()
    }),
    ..Default::default()
};
Simple window decoration example
#[derive(IntoElement)]
struct HeaderBar;
impl RenderOnce for HeaderBar {
fn render(self, _window: &mut Window, _cx: &mut App) -> impl IntoElement {
div()
.flex()
.h_10()
.w_full()
.bg(Colors::dark().background)
.child(
// This element stretches over the available space on the left
div()
.h_10()
.flex_1()
.bg(gpui::white())
// IMPORTANT: Don't put this on the most outer element! The most outer `window_control_area` will overwrite it!
.window_control_area(gpui::WindowControlArea::Drag),
)
.child(
div()
.h_10()
.w_12()
.bg(gpui::yellow())
.text_center()
.text_color(gpui::black())
.window_control_area(gpui::WindowControlArea::Min)
.child("MIN"),
)
.child(
div()
.h_10()
.w_12()
.bg(gpui::blue())
.text_center()
.window_control_area(gpui::WindowControlArea::Max)
.child("MAX"),
)
.child(
div()
.h_10()
.w_12()
.bg(gpui::red())
.text_center()
.window_control_area(gpui::WindowControlArea::Close)
.child("X"),
)
}
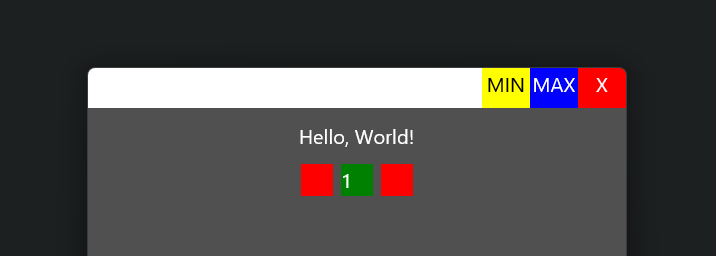
}This example will produce a Titlebar that can control the window and looks like this.